#1
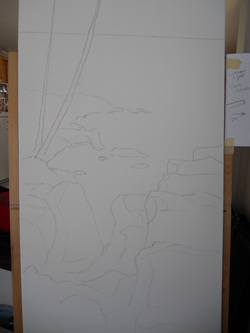
I started out with a preliminary sketch using graphite. This is not a finished drawing, but just a guide for my painting. The forground has alot of rocks and ledge and the straight line near the top will be the horizon between sky and water. This will be the rocky coast of Maine.
I started out with a preliminary sketch using graphite. This is not a finished drawing, but just a guide for my painting. The forground has alot of rocks and ledge and the straight line near the top will be the horizon between sky and water. This will be the rocky coast of Maine.
#2
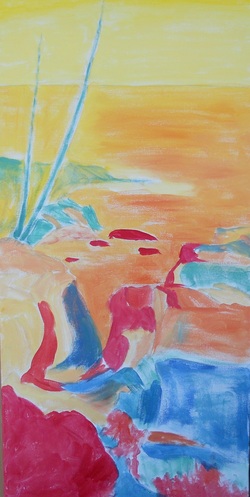
This is my underpainting. As you can see I used a variety of colors, which are opposite from what the finished colors will be. This will give a warmer and more interesting look to the final painting. It also gives the idea of shapes for future placement of the objects in the picture. Notice that some areas are much lighter. This indicates where the direction of the light source (sun) is coming from and how that will affect the final colors.
This is my underpainting. As you can see I used a variety of colors, which are opposite from what the finished colors will be. This will give a warmer and more interesting look to the final painting. It also gives the idea of shapes for future placement of the objects in the picture. Notice that some areas are much lighter. This indicates where the direction of the light source (sun) is coming from and how that will affect the final colors.
#3
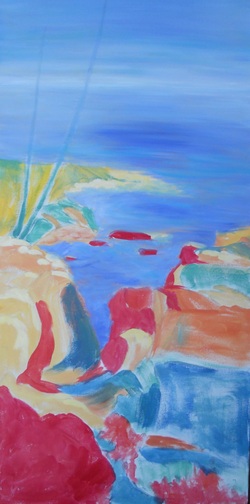
I painted in some sky and water color.
The horizon line is very faint at this point, but I didn't want it to be very prominent, so I left it as is until later.
At this point I needed to be thinking of how I would proceed with the rocks next.
I painted in some sky and water color.
The horizon line is very faint at this point, but I didn't want it to be very prominent, so I left it as is until later.
At this point I needed to be thinking of how I would proceed with the rocks next.
#4
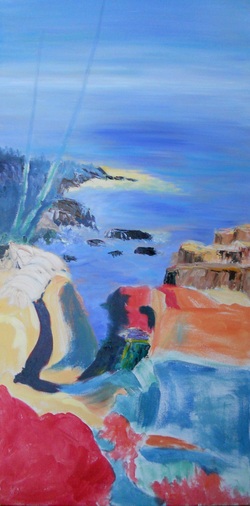
I decided to do my rocks and ledge with a pallet knife. It gives more texture and interest.
I began to lay in some color on the rocks. Right now the ones in the water are "black" with a little hi-light on them. Later they will be surrounded by sea foam. The rocky ledge on the right (top) is for the most part, the color it will be. I will work on any more touches of color as the painting progresses.

#5
As you can see, I started laying in some color on the big rock on the left. This is a process of layering to show variation in shape, color, shadow & hi-lites.
As you can see, I started laying in some color on the big rock on the left. This is a process of layering to show variation in shape, color, shadow & hi-lites.
#6.
I worked a little more on the big rock giving it a bit more shape.
The ledges in the center, and nearest the water, are now put into place.
Keep in mind that all the "bright" colors at the bottom are still just underpainting.
I did define my horizon a little in this one by adding a lighter color above the line and some aqua just below.
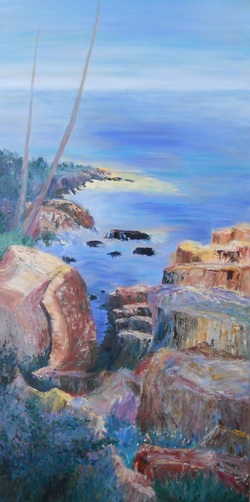
#7.
You will see in this photo that I was working in 4 areas.
Look at the rocks just behind the two tree trunks. I added more shape and hi-lites.
The big rock on the left was also reshaped some and more color added.
I laid in two large ledges on the right. These were preliminary as I continued working at exact shape, shadows and hi-lites.
I also added some rock and vegetation in the center between the ledges and the big rock.
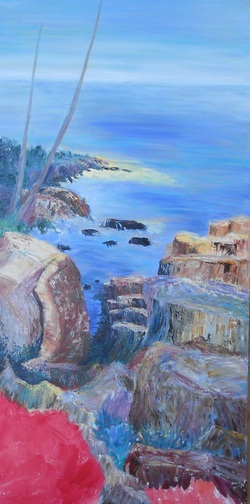
#8.
I decided to place another rock closer to the ground between two of the large ledges. It is to add another dimension and a barrier to create depth. The larger ledge in front was very flat on top, so I created more shape by making a crease in the center of it. Hopefully this will add more interest in the finished painting.
I have also put in another rock near the bottom right in a darker color to also create more depth.
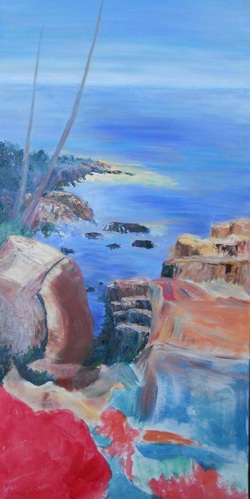
#9.
As you can see, I finally covered the red area on the bottom left. This is mostly vegitation.
Can you see the small shrub-like tree and the bluish grass that indicates a possible flowering plant?
The next couple of steps should be getting close to a finished product.
As you can see, I finally covered the red area on the bottom left. This is mostly vegitation.
Can you see the small shrub-like tree and the bluish grass that indicates a possible flowering plant?
The next couple of steps should be getting close to a finished product.
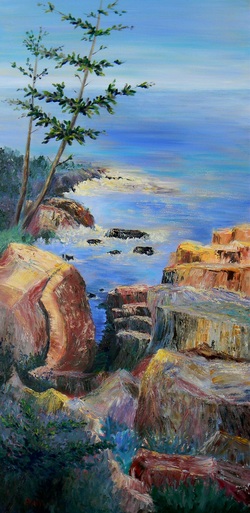
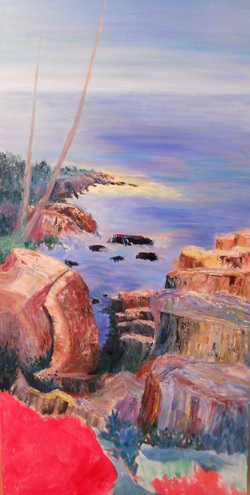
#10
Well friends, here is the final painting.
As you can see, I put leaves on the trees, and added more sea foam around the rocks and on the shoreline.
I also added hi-lites with white and yellow on various rocks and on the water. This is to show where the sun would be hitting and gives the overall painting more interest.
I hope you have enjoyed following along with me on this one.
I named this piece "Acadia" as it is located in Acadia National Park in Maine.
This painting was used for advertising for The Festival of Art in Belfast, Maine. I was chosen as their featured artist in 2011, which was a great honor.
Oil on Canvas - 36"x18" - custom framed - SOLD
